


How to Make a Homecoming Diamondback Braid Tutorial
Updated: May 31
The diamondback braid. AKA the bubble gum chain.
No doubt you have seen these braids and believe it or not they are extrememly easy to make. They are time consuming however more so than the other braids. I love using these to put trinkets and charms on. Since they are flat they lay nicely in the mum anywhere!
If you'd rather watch a video tutorial, visit the Melz Mumz YouTube channel.
If you find this tutorial useful, please like, share, and subscribe to our Social Media!
Your support helps our small family business. Or buy me a coffee :)I
So let's get started!!
SUPPLIES:
Step 1:
Cut all of your ribbon. You must be precise. I have found the 7.25" works just right for me. If you cut it too short, the ribbon won't fit inside the other when braiding and if you cut too big you will have a gap. If it is a little over the 7.25" you will be ok, it isn't very noticable, but try to get as close to it as you can.

Step 2:
Fold each piece of ribbon EXACTLY in half and crease it and re open the ribbon.

Step 3:
You are now going to fold the end of each ribbon to the crease in the middle that you just made.


Step 4:
Fold back in half.

Side View

Continue to do this to all your pieces of ribbon and you will have a bunch of what I call "chompers" – well that's what they look like to me anyway!

Step 5:
Pick up one chomper in left hand and one in right. Have the open end of the compers facing out. This is where you are going to start "braiding" them.

You feed them into each other. The open end of the right chomper will go in two "loops" of the left chomper.
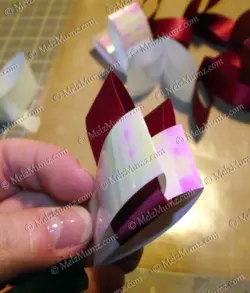
Pull all the way through and make sure the one that was in your right hand that you fed into the left – the right one needs to be moved to the end tightly. Now staple right in the middle of where the two connect.

Step 6:
Start weaving! Take the next chomper and feed it from the left into the top going towards right. Same way as you did the first piece, the open end of the chomper feeds into the open "loops" of the other. Pull all the way through tight.

Once done pull the next piece though from the right side up to left. Keep going!!
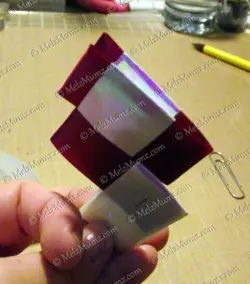
After you weave all the pieces, staple the last piece to keep in place and you have a Diamondback braid!!

Thank you for looking!
If you found this post helpful please share, like, subscribe and follow our pages (links at top of page) to see future content.
IT REALLY HELPS OUR SMALL FAMILY BUSINESS :-)
And as always, HAPPY MUMMING!
Melissa


Comments