


How to make a Drill Team Hat Tutorial for Homecoming Bear
- melzmumz
- 3 hours ago
- 4 min read
Hello!! After so many requests asking how I make my hats for my drill team bears that I put on Homecoming Mums, I created a step by step tutorial to show you how I personally have made them for years.
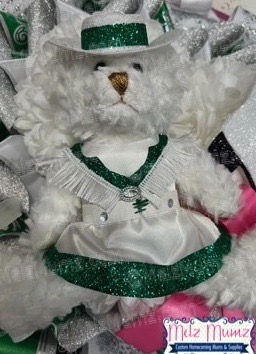
When designing this hat, I tried many different methods. My main goals were: to look authentic, be efficient in how long they take to make and lastly to keep cost reasonable. If you have any questions please feel free to comment and I will address them as soon as I can! Also if you would like to see examples of my drill team bears please hop over to my website Melz Mumz and look at the dozens of photos through my site and in the album.
LET'S GET STARTED!!
Supplies Needed (click on each item for link):
1 – 2" square piece of craft foam 1mm or thicker
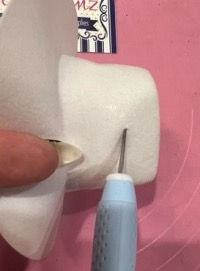
STEP 1
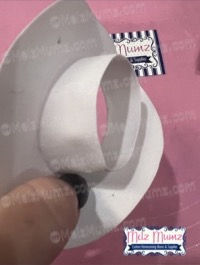
Hold the Cowboy Hat and use your exacto knife to make an initial cut about half way down on the hat. If you are worried about an uneven cut then insert the knife a little above half way mark. You will be cutting this down to make even.
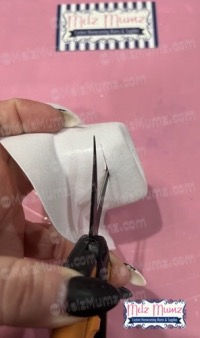
STEP 2
Using detail scissors, cut around the hat starting in the initial cut you made with knife. You of course can try to use any scissors but detail scissors let you cut with more precision without compromising the structure of the hat. Regular scissors are not fine enough to fit in the initial cut without causing damage to the hat.
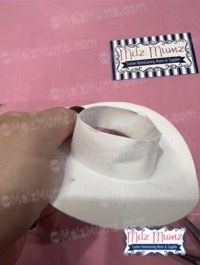
STEP 3
Holding hat the proper way up, look at the edges and compare sides to make sure your cut is as even as possible. You may have a few snags from first cut to smooth out. This doesn't have to be perfect however you do want all sides to be as even as you can because the top will be flat.
This shows top right after initial cut and how it is uneven
This shows top after it is evened out
STEP 4
Get your piece of craft foam and turn hat upside down (the part you just cut). Press firmly into the fun foam with enough pressure to indent the foam but not damage the hat.
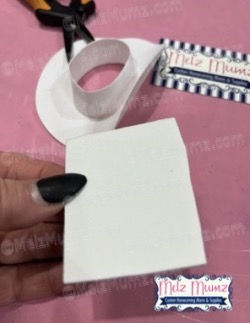
Cut a piece of craft foam bigger than top of hat
Turn hat over and press into craft foam to create indention
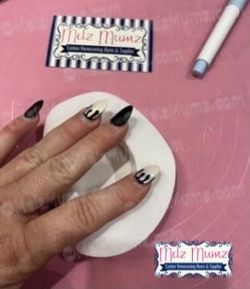
STEP 5
With detail scissors cut your craft foam around the indented pattern. Do not go inside of that indented line. Try to stay to the outermost edge of that indention.
This photo shows the slight indention left after pressing hat into foam
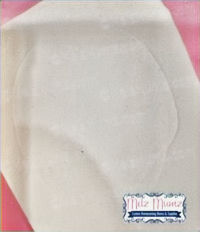
This photo shows the piece of foam cut out from indention. This will be the new top of hat.
STEP 6
Now take that piece of foam and fit it into the top of the hat where you cut. This is the new top of your hat. Make the foam even with the edge of the top of the cut (foam will be inside the top of hat not outside – should be flush to the top of the cut). The indention you made in foam was to make sure the pattern you cut out of foam will match the shape of your hat and fit snugly.
STEP 7
Turn hat over (looking at inside) and use low watt glue gun (higher watt gun can make the hat warp or melt) and glue a thin layer of glue around the foam to hat joint. Turn hat back over to make any adjustments to foam before the glue dries (for example if you need to push edges flush to each other. Sometimes when I am being quick I might push a little too hard with glue gun and move the foam a tad).
STEP 8
Now get your paint brush and your glitter glue. I have a link to Stickles by Ranger because it is my personal favotite. The glitter is super fine and dries to a nice finish that doesn't flake off. Put the glue on thick on top and use the paintbrush to spread around and cover hat. Make sure you put extra glitter glue where the foam meets the hat. This will help seal the edges and also fills it in and helps to hide that the top is a separate piece. Now paint on the sides, top and bottom of hat with the glitter glue to make nice and sparkly!!
STEP 9
Once dried, cut your trim and glue around hat. TA DA! Custom drill team hat for your bear!
*TIP – these hats are made in a few different colors. I only use white and then decorate with the trim, however if you decide to use a different color hat make sure you use the same color glitter glue as the hat. The glitter will not show clumped anywhere and blend better.
I hope you have enjoyed this tutorial! Please comment with any questions and like and share if you found it helpful. I will be posting more tutorials soon and have a bunch already posted in the tutorial tab. My website is MelzMumz.com where you can purchase supplies, kits and custom made mums and garters OR just look at some mum inspiration
As always, HAPPY MUMMING! – Melissa
Comments